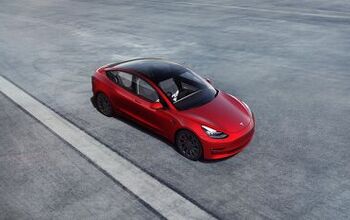
Building A Cheap $8,500 Tesla Model 3

We take our cheap & high mileage Tesla Model 3 from boring commuter appliance to rally-inspired snow demon thanks to a host of upgrades.
Those upgrades came from Mountain Pass Performance and the very best winter tires on the market from Continental Tire!
Speed Academy is a website and YouTube channel based on making things go fast and enjoying cars. Peter Tarach and Dave Pratte are the forces behind Speed Academy.
The TTAC Creators Series tells stories and amplifies creators from all corners of the car world, including culture, dealerships, collections, modified builds and more.
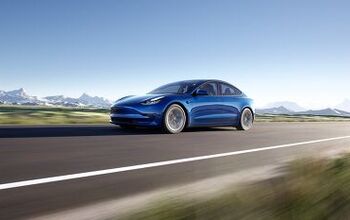
[Image: Speed Academy/YouTube Thumbnail]
Become a TTAC insider. Get the latest news, features, TTAC takes, and everything else that gets to the truth about cars first by subscribing to our newsletter.
Transcript:
Ever since the hate train left the station with Elon and Tesla, Model 3 prices have dropped so much that the bargain hunter in me couldn’t resist. I had to get one. My plan is to build the ultimate go-anywhere winter beater.
I picked up this 2019 Tesla Model 3 for a measly $8,500 USD, which works out to about $12,000 Canadian. It has 172,000 km, just over 100,000 miles. It has a clean title, but it’s definitely not mint condition. The paint is cracked and flaking in multiple spots, there’s a big dent in the lower rocker panel, and the rear windshield is cracked—which means the defroster doesn’t work.
The battery will only charge to about 300 km (roughly 180 miles) of range. I’ve been daily driving it for the past six months. During that time, the 12-volt battery died, which I replaced with a Pro Series unit. The rear camera also failed, which Tesla fixed for $260, surprisingly reasonable.
Then came the big one. A rock from a truck put a baseball-sized crack in the windshield. Tesla quoted $3,500 to replace both the front and rear glass. I’m not doing that, because it’s a sunk cost at this point. The whole point of this car is just to experience what EV life is like.
If you want to hear Dave and my honest thoughts on Model 3 ownership—what we love and what we hate—we just released a full breakdown on our second channel.
But in this video, we’re going to prove the EV haters wrong and turn this boring Model 3 into something seriously fun and unique.
To me, the ultimate winter vehicle is something like a lifted Subaru or Evo with a rally look. That’s exactly what we’re going to do here. The only difference is that this car is rear-wheel drive, which should make it even more entertaining.
Let’s get this thing on the hoist and get started.
First up, we’re removing the current wheel and tire setup. These aren’t Tesla Aero wheels—they’re actually aftermarket wheels from CRW, available at Canadian Tire. If you’re a Canadian looking for an affordable wheel option for your Tesla, these are worth checking out.
For tires, we equipped them with Continental SecureContact AW tires. These are new from Continental, and the AW stands for All-Weather. They’re a true four-season tire, so you don’t need to swap to winter tires. They’re rated for severe winter conditions and also offer strong wet braking and good traction in wet, dry, and snowy conditions.
For people who live in climates where snow only shows up occasionally, these are a convenient solution. Of course, if you live somewhere with harsher winters like we do, a dedicated winter tire will still perform better—but it requires swapping wheels and tires every season.
These also have a 700 treadwear rating, so they should last quite a while. As part of Continental’s Total Confidence Plan, they’re warrantied for 60,000 miles (100,000 km). The plan also includes roadside assistance and even a hotel stay if a tire failure leaves you stranded far from home.
While we have the car up in the air, I’m getting my first proper look at the chassis. Honestly, it’s more rusty than I expected for a 2019, which says something about the build quality.
You’ll also notice a lot of parts from Mountain Pass Performance. That’s because this car actually lived part of its life as a test mule for some of their components.
Even in the frunk, there’s quite a bit of corrosion on bolts and suspension top hats. Before removing anything, I’m spraying everything with Fluid Film. Most people think it’s just for undercoating, but it works great as a lubricant as well. It helps loosen rusty threads and gives us a better chance of removing the hardware without breaking anything.
Next, we’re removing the old suspension. These are five-year-old Mountain Pass coilovers with over 100,000 km on them, including several winters.
Thanks to their stainless steel bodies, they’re still in surprisingly good condition. There’s actually nothing wrong with them, but these are the two-way Sport version, and I want to switch to their Comfort spec.
Interestingly, the Sport coilovers already ride better than the factory suspension, so I’m curious how the Comfort setup will feel.
Some people think these are just rebranded KW coilovers, but that’s not the case. KW manufactures them, but Mountain Pass handles the engineering, valving, and design.
Now we’re installing the Mountain Pass Performance V2 lift kit. This raises the car slightly and gives it that rally-style stance.
The kit allows for five different ride heights, from about 1.75 inches of lift down to roughly 3/8 of an inch. We’re going with the full lift.
Installation is pretty straightforward: spacers go up top, and another spacer sits under the spring perch. While we’re here, we also refreshed the toe and camber arms with new Mountain Pass parts. The old ones were still fine—I just wanted fresh components installed.
For wheels, I chose a proper set of OZ Racing rally wheels, sized 18x8 with a +35 offset. I wanted that classic rally-inspired look.
They’re wrapped in Continental VikingContact 8 winter tires in 225/50R18. They’re slightly narrower than typical fitment, which helps cut through snow and ice while also adding to the rally aesthetic.
These tires feature a ton of siping for extreme winter conditions. According to recent tire tests, they’ve performed extremely well in snow and ice.
After installing the lift kit and wheels, the car gained about 74 mm of height, with roughly 5 mm of rake. The rear sits slightly higher than the front.
Honestly, it looks better than I expected. I was worried lifting a Model 3 might look awkward, but with these wheels it has a cool safari-style rally look, similar to those lifted Lamborghinis and Porsches.
Next up are mud flaps. For this build, there’s really only one choice: Rally Armor.
The standard Tesla mud flaps are decent, but they’re not nearly aggressive enough for what we’re doing. Instead, we’re installing Rally Armor motorsport-spec mud flaps.
Rally Armor even customized them with our logo, which is a nice touch.
Using the provided template, I drilled mounting holes and installed the larger flaps. The front sits a little lower than the rear, but if I lowered the rear to match, it would hang too far down. Leaving it slightly higher actually balances the look.
The final visual piece is a set of rally-style auxiliary lights.
Normally you’d buy a vehicle-specific light pod, but I couldn’t find one for this car. Instead, my friend Dan from FourStar Motorsports sold me a generic rally pod from their shop stash.
Rather than cutting into a perfectly good hood, I bought a damaged hood from Facebook Marketplace for $100. Since it was already dented, I didn’t feel bad modifying it.
After trimming and shaping the fiberglass pod, I painted it. Unfortunately, the spray-can color didn’t match the Tesla white perfectly, which is common with three-stage paint.
For lights, I chose the classic Hella 500 driving lamps, sourced from FCP Euro. To simplify the install, I removed the plastic housings and bonded the lights into the pod using urethane panel bonding adhesive. It sets in about three minutes and becomes extremely strong once cured.
Once wired up, the lights look great—but there was one more challenge.
This base Model 3 doesn’t have factory fog lights, so we couldn’t use the normal fog-light control in the touchscreen. Instead, we wired the system to activate with the high-beam circuit using a solid-state relay. That way, the rally lights come on automatically with the high beams.
When we tested them in the dark, the output was incredibly bright.
The final modification was something the car desperately needed: the ability to disable traction control.
Tesla normally keeps stability and traction control active at all times, which makes spirited driving difficult. To solve this, Mountain Pass installed their Party Box module.
This device allows the driver to fully disable traction control and stability control. It has two modes: a normal mode and a “Hoon Mode” that allows the motor to spin freely for drifting or track driving.
Installation is mostly plug-and-play, and activation is simple. Hold a button on the steering wheel for a few seconds, and traction control turns off.
With everything installed, the build was complete.
The lifted suspension, rally wheels, winter tires, mud flaps, and rally lights transform the Model 3 into something entirely different. It looks aggressive, drives well in the snow, and is far more entertaining than the stock car.
After driving it in winter conditions, I can confidently say this thing is an absolute beast in the snow—and it rides great too.
Huge thanks to Continental Tire for sponsoring the video series. If you’re looking for winter tires, all-weather tires, or performance all-season options, check out the link below.
We’ll see you in the next one.

Speed Academy is a website and YouTube channel based on making things go fast and enjoying cars. Peter Tarach and Dave Pratte are the forces behind Speed Academy.
More by Speed Academy, TTAC Creator


Comments
Join the conversation
The battery will only charge to about 300 km (roughly 180 miles) of range.
You don't say.
CANADA MAKES EVERYTHING BETTER